The half-closet sound booth - Cheap & Effective
- kristinarothe
- Mar 16, 2023
- 7 min read
This is a continuation of the booth journey series. Click here if you wanted to read the first post. If you want, you can also jump straight to my "shopping list".
Cost factor: $250 + equipment / upgrades (~$750) + being extra ($770)
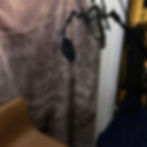
V1 - the tiny half-closet
Once it became clear that I wanted to continue this Voice Over journey along with acting, it was time to do something about the recording environment. (Note: everyone's journey is different. This is just to share my own experience and steps, and maybe you get some ideas or pointers from it, too :))
That microphone screen from the last version clearly was not it. Part of the challenge was that we were living in a rental house and we were not going to move houses just because of this (yet). Also, we didn't have a good walk-in-closet where I could record from. But, my tiny office room DID have a half-closet. or... quarter-closet? Maybe I could use that. The other challenge was that for the acting side of things I needed to leave room to record self-tapes (think backdrop, tripods, some lights, camera and room to move in), so I might need to take down the booth occasionally.
I eventually learned about VocalboothToGo.com, who sell acoustic blankets which seemed like a great compromise for me, and they also sell frame options - both PVC frames and T-Stands, which were perfect for me. That helped me to extend the booth a little bit and this whole construction worked quite well.
First, I cleared out the closet. Aside from the very top shelf, I removed everything I could. On the top, I put duvets and blankets, and I covered the back wall with some thick, dense and heavy comforters, suspended from the top shelf via boot hangers.
On the window facing side, I hung a producer's choice blanket from a FlexTee Stand. On one end, I stuck a bathroom organizer between the wall and the desk - the reason for that was that the acoustic blanket was not flush with the wall on that side, so this gave me additional storage space while also letting me stuff a couple of cheap couch cushions between the wall and the blanket.
At this point I also got some great recommendations from a dear friend and mentor of mine, German Voice Actor Marco Rosenberg, as well as the amazing Jim Edgar. Marco told me about acoustic plates made of something called basotect (by BASF), which unfortunately weren't available here in the US. The closest I could get that seemed to be really highly regarded, was foam by Sonex One, which I got from Soundaway. Try and aim for at least 2", preferably 3" thickness. 1" thick foam won't help much, so I went with 3". And if you happen to read from Europe, try and get your hands on some Basotect plates :)
Anyway, I got a couple of those Sonex One plates and stuck them at a couple of places inside the booth - sometimes just leaning them, as the booth was small enough anyway - as well as on top of the FlexTee Stand, to cover that top opening. If it sounds like there wasn't a lot of room left, it's because there really wasn't.
Filling the space
The walls treated, it's time to fill it with recording equipment and some furniture! I switched to a boom mic stand that was poking into the acoustic blanket a bit but allowed for a better angle on the microphone. To sit, I got a faux leather bar stool from a local box store. No point in standing anyway, not enough room :D
The bathroom organizer shelf is where I put my sound interface as well as other stuff that was handy to have nearby.
I also used a very sturdy, heavy music stand I got from facebook marketplace, covered some fabric and adorned with over-the-door hooks to hold various devices, like for example my ipad, a portable USB monitor and / or a bluetooth numpad... and others.
My laptop was kept at the other end of the room. It's a high performance device with a very audible fan, which I did not want too close to the microphone, so I had to solve being able to see and control the screen from afar - that is where the bluetooth devices and portable monitor came in, which worked great. The hardest thing to solve was the mouse - in a moment of "I'm so clever" i got a trackball mouse and tacked it to the note stand, but it turns out those trackballs don't work very well when kept vertically.
Oh! I almost forgot! Lights! Because it a friggin' dark in there. To help with that I got a rechargeable cabinet light and stuck it on the shelf above my head. ...only to later not use it during recording because it would create some kind of electric interference that was visible in the spectral view of the audio. Womp womp.

Dialing in the Sound
Through some consulting and learning sessions, Jim Edgar basically helped me achieve the unachievable and turn this tiny 2.5x2.5ft cell into something that actually sounded very decent. So, thank you, Jim. For one, it was a combination of strategically placed acoustic foam, comforters, cushions etc, as well as adjusting the microphone placement. Secondly, he helped me dial in the processing side of things with EQ settings etc.
Meanwhile, I upgraded my interface from the Mackie Onyx (which was really not great) to a Solid State Logic SSL2+, which I still use. And I ordered a Rode NT1-A Large Diaphragm Condenser Microphone which I worked with for quite a while. See, I thought the -A meant it was better than the NT1, but in hindsight I would have just bought the RODE NT1 instead.
Verdict & Results
I'm gonna be really honest here. On the one hand, I'm extremely happy and grateful we made it work. I was able to audition from it, landed some short form and long form voice over work (including some audiobooks that have been released) and had a dedicated place to work from. I really did not have a lot of space to work with, and this was a fantastic and affordable solution - especially if you leave out the stuff I got because I was a bit extra. Seriously though, this worked great for a good while early on, so especially as you're still dipping your toes into it, there are various great DIY solutions that can serve you well for a long while - especially if you happen to have a real walk-in closet. :)
BUT.
It was so small. And dark. I think, had I gotten the acoustic blanket with the white side, it would have helped a bit, but it did get a little depressing after a while to work in the dark.
Additionally, the ability to interact with my tech was kind of limited and it took me a good while to figure out the solution with the portable screen. The lack of a small desk of sorts, the fact my laptop had to be so far away etc., posed its own set of challenges. My friends and I were able to figure out most of them, but some persisted. So in hindsight... if I was to go back and do it again at that time, I would do it the same way, yes. But going forward, I know that I need more space and more light.
It's also important to note that the acoustic blankets are great for acoustic treatment, but, just to be very clear, they DO NOT SOUNDPROOF. Acoustic treatment and soundproofing are two very different things. If you live next to a busy road (which we did) and expect those blankets to magically drown out the rumbling of large delivery trucks... don't hold your breath. Not gonna happen.
I knew that and was already prepared to record during the night, but at some point the road next to our house started to become highly frequented at nights, too, which added to the frustrations.
All this informed a couple of key factors for what the next booth would be - because eventually we decided to start looking for a bigger house. My Voice Over specific criteria were:
- quiet, residential area, somewhat removed from main roads
- my partner's and my office rooms needed to be separate enough that we both could work without hearing each other
- wherever the booth was going to be, it needed to be big enough to allow for a booth that was at least 4'x4' big, preferably more.
Space. Quiet. And light. I learned that, to be in my happy place, I needed those things. And I can tell you this much already - I got it :)
Next week I'm going to tell you about my really cool "space ship" booth (v2) that Travis built for me. I absolutely loved that thing :)
Anyway, here is the list of things that made up my recording environment:
My Shopping list:
Boot hangers - $10 or less
FlexTee Stand - ~$100 (sometimes you can find preowned options for a little less)
Producer's Choice Blanket - ~$65, some are less, others are more. Note: pick the ones with one white side. It can get REALLY dark inside otherwise, as I have learned.
Sturdy Music Note Stand - $10, via Facebook Marketplace. Seriously, check the marketplace, craigslist, ebay, local musician groups for used gear like this for great offers. Goodwill etc sometimes also have great options.
Some felt, thick fabric or a dense bath rug and towels to cover the (metal) stand - $20, local store
Over the door hooks - $8 - to hold the ipad/screen a bit higher
Cabinet Light - $20
Optional, because I was a bit extra:
Sonex One Acoustic Panels - nowadays $307 per 4-pack plus shipping - I got 2 packs. I specifically bought mine at Soundaway, as they are one of the very few places that sell Sonex One Panels at 3" height.
Bar stool - $100. I got one from a local shop but it looked like the one linked here.
Wooden bathroom organizer, over-toilet style - $50? also from a local shop. I don't remember what it cost, it definitely is not fancy. Similar to this, just simpler
Couch cushions - $20 total. Got them from a sale over at Kohl's when I dropped off an Amazon return and got a 30% discount voucher for that.
Equipment I already had:
Boom Mic Stand - ~$30-35
Laptop (in my case a razerblade, though if you were to pick a new one, I'd suggest a fan-less option)
A whole bunch of cables
Upgraded tech:
RODE NT1-A Microphone - $200
Portable USB Monitor - $130
Bluetooth Keyboard or number pad - around $30