Spacious, affordable and DIY - Booth v2
- kristinarothe

- Mar 24, 2023
- 7 min read
At some point - after many frustrated text messages to my partner bemoaning the perpetual noise of trucks, cars, SUVs, folks using the road as raceway etc and partly due to the fact that working from home was not going to go away anytime soon - we decided to move into a new house. Knowing that work from home, voice over and the occasional self tape recording were big factors, we had a good idea in terms of what to look for - oh and we didn't buy, we would rent, which makes a big difference in terms of the type of construction work you would (not) be able to do to set up your booth.
Deciding on a booth style
While we were searching and later getting ready to move, I did a ton of research on what DIY booth options would be available to me as a renter. Generally speaking I needed something that was stable and spacious without any kind of construction work on the house that could not be undone later. I quickly read up on PVC booths, which are a great way to do this very affordably - you can either work out all the parts yourself or you can order a kit from vocalbooth.com where everything is precut. It works especially well for smaller booths, but has a couple of drawbacks:
- you need to stabilize the PVC frame a fair bit - the bigger you want the booth to be, the better your stabilization should be. The acoustic blankets that are hanging from the frame are relatively heavy, so you want to take that into account. Since I wanted to go around 5'x7', that was an important factor
- when you cut the pvc pipes to length, you better be fairly precise so that fits
- once you add more connections for the stabilization, figuring out and finding the right connectors became a little bit too much mental gymnastics for me
Of course, these are all solvable problems and I wasn't completely against the idea. But then I met Cherie B Tay on Clubhouse, and she mentioned her $450 booth that was basically made out of those metal shelf sets that are typically used in garages, warehouses, storage units etc. - and my interest was piqued. This seemed perfect - an easy way to keep things level, connect things flexibly - and sturdy!
Two challenges at a glance:
- the shelves have some depth to them, taking up a fair amount of space on either side
- the fact that they're made out of metal. That would need to be taken into consideration for the acoustic fine tuning later.
I shared this with my partner and we started looking into options, possible shelf sets to buy etc. Before I knew it, he got really creative and started to build out a 3D model of a booth using the individual shelf parts, where the individual assets would represent the corresponding shelf pieces at scale. We would also integrate a bunch of the pieces that I still had from my previous booth.

This turned into a really neat little project, both digitally and for real. I could play around with options for how I wanted the booth to look like and we'd have an instant shopping list via the convenience of knowing how many 3D assets were used. You can order the individual pieces at DIY stores, such as your local Lowe's or Home Depot. Aside from the metal shelving frame components,

we added some wooden boards as desk and for added stability, as well as a couple of wooden beams to a) carry the "roof" and b) hold the lights. Lastly, we got industrial strength .... pool noodles. Yepp, pool noodles. Anything that wasn't covered in fabric or foam already, got covered in pool noodles, held together with zip ties. And I LOVED the result. And technically they're called foam pipe insulation. So. Pool noodles. ;)
Assembly
The assembly of the booth took a couple of evenings, partly because of the sheer size of that thing.

It comes with the usual noise of hammering in the snap connectors. I also highly recommend assembling this booth as a group of 2 or 3, as that will make holding things in place a lot easier once you get to actually setting up the booth frame.

You can easily begin by putting the first side down, laying all the pieces out as they will go together.
We - or I should probably say he - started by assembling the two longer sides of the frame and setting them to the side. Each side of the frame has some reinforcing horizontal bars added, that would later also be used to hold the acoustic foam. Once the two longer sides are assembled, one of the tricky stretches starts: assembling it while keeping the tall, long and VERY WOBBLY (for now) sides in place. That is where the 1-2 helpers, patience, some drinks and snacks will come in handy. The following two photos show two states of the booth frame, giving you a very good idea for what you're going for here. The top one is already in a pretty good state, but missing some reinforcing wooden bars and wood, as well as the ceiling. The bottom image is the finished frame and already includes the desk and some acoustic foam on the back side.


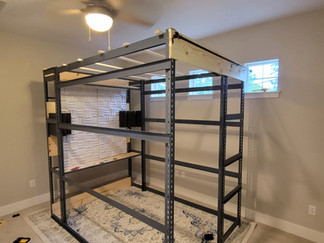
Going forward, a couple more things needed to be added - one more crossbar on each side, a few more wooden boards, the roof construction, and then obviously quality of life things like ... lights. and a desk. :)
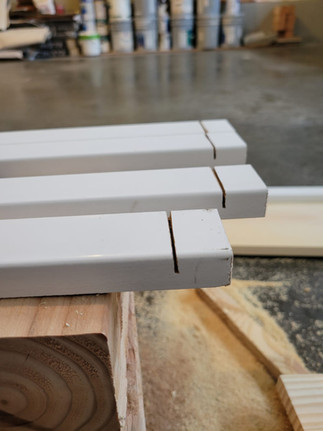
Moving on to the wooden beams for the roof, we added two things: a cut on each side, so that the wood could lock into place on the frame itself, as well as metal hooks which would later hold the acoustic foam on the ceiling.
The desk was just a regular wooden board decorated with contact paper to make it look pretty; and for lighting we just used regular LED light strips that ran through diffuser tubes. On one of the pictures below you can also see some of the professionally used pool noodles, err foam pipe insulation ;)


Acoustics & Finishing up
At this point, the booth frame was pretty much ready to go, the light was installed and wired up, and what was left was insulating / acoustically treating the heck out of that booth.
I reused the Sonex One acoustic panels I had already ordered for my previous closet booth:
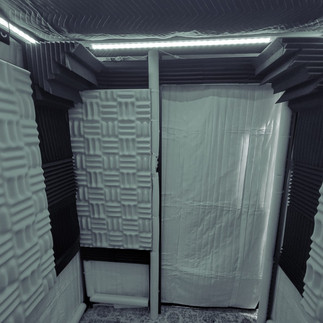
One on the ceiling where I recorded, two on the back (by the desk), two on each long side wall and one by the entrance. the ones on the sides were actually glued to cardboard and then the cardboard was attached to the metal frames. That makes deconstruction a little easier later.
Additionally I stuffed 12"x12" foam tiles that someone was so kind to gift me everywhere I could, plus some bass traps for the corners.
The walls themselves were made up of more Producer's Choice Acoustic Blankets by VocalBoothToGo. As you can see, I was a little smarter this time and ordered the one with a white side, to keep it somewhat brighter in there.
The ceiling itself was a combination of moving blankets and comforters :D
I used a little night stand as additional sidetable - covered in a flat sheet - , plus an old chair I already had around - that one has been with me for over 10 years now and come with me from country to country, city to city. It's comfy and doesn't make noise, so it makes a decent chair to narrate in. I also put an XL mousepad on the desk as padding.
This booth was large enough to support two separate microphones - one on a desk boom for seated narration, one on a mic stand for standing voice over-, a little table for copy, a music stand for copy when standing, a fan and just ... to move around in. I really loved that booth, and it still has a very special place in my heart.


One challenge
This booth has seen me through many coaching sessions and classes, has been with me for my first batch of demos, a bunch of audiobooks and then some. It just had one problem: while the acoustics were great, it didn't do anything for soundproofing. Which was fine - we moved into a pretty quiet, residential area so i was hoping that that would be enough. But the number of trucks & SUVs slowly driving through the neighborhood for family related errands and the fact that we're living near a sea plane harbor proved too much for this little booth to hold up. If we lived on a ranch, somewhere with a bigger property around us or in a more solidly constructed house (think stone walls etc), then this booth would be fantastic and I'd still be recording in it. Maybe swapping out the lights for something warmer, but otherwise this booth was perfect for me.
So, this came out a little bit more involved and a bit pricier than Cherie's awesome $450 booth, but i love the space and customization - and the sound treatment that came with it.
We used
- individual frame parts from boltless shelving + some smaller hooks and pieces from home depot
- wooden boards to stabilize and as desk, also from home depot
- very light wooden beams, you guessed it, from home depot
- foam pipe insulator, again home depot
- LED lights
- Sonex One 3" acoustic panels from Soundaway
- 4x Acoustic blankets from vocalboothtogo
- moving blankets and comforters you might still have
- (optional: high pile rug)
If you budget around $1000, you'll be in a pretty good spot. You can make adjustments in either direction - and of course, you can go PVC or use the shelf kits if you like! This is a fun project where you can pick the direction that works best for your needs :)


Comments